 Over the past few weeks, I have discovered a new favourite store (it’s OK Bunnings, I still love you the most). I was shopping at Chadstone for something completely unrelated, and got sidetracked as I walked past Kaisercraft, which somehow I had never seen before. The company is Australian (which I love), and describes itself as a craft and scrapbook wholesaler and supplier – it sells beautiful scrapbook paper, stencils, stamps, embellishments, you name it. It also stocks a range of MDF products that you can put together and decorate yourself using paper, paint, etc – kind of like 3D scrap-booking. I could have spent all day (and all my money) in there. Lucky for me, my sister GG gave me a gift voucher for my birthday! Lucky me! Here are the projects that I have made from there so far:

I fell in love with this as soon as I saw it, because my desk is generally terribly unorganised, somehow despite the pen holders that I improvised out of boxes. To my delight (not sarcastic), when I unpacked it, there were no instructions on how to put it together – that always makes it so much more challenging!

My improvised desk organisers

I painted all the pieces antique white before I started putting them together. It took ages and I was very sick of painting, but I knew I would regret it if I tried to do the painting once I had already assembled the pieces – my usual impatient modus operandi. I joined all the pieces using a generous spread of wood glue, and sat some heavy books on the finished structure (because I didn’t have any clamps!). It’s surprisingly solid now.


I decorated using scrapbook paper that I had at home, which I stuck on using a thin spread of PVA. To protect the paper, I “painted” over the top with some more PVA, diluted to about 1 part PVA to 2 parts water. It didn’t work very well, as it made the paper swell and pucker, and in fact made the colours run a bit (I came up with a solution to this problem during the next project). Finally I glued on some old 1 and 2 cent coins that I had at home as accents – I love their burnished copper colour, plus they have lizards and possums on them! Australian money is pretty.


Now my desk is organised, and much brighter than it was before!


Cost:
- $30 for the Desk Organiser
- I already had the paper, paint and glue.

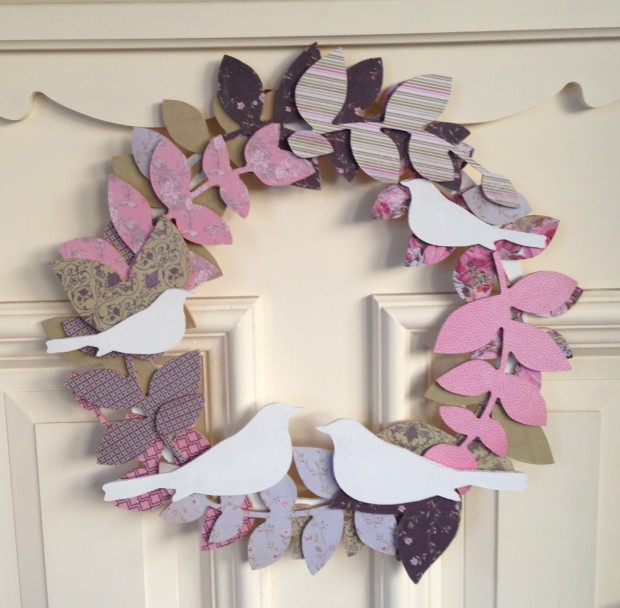
This is actually called “Funky Wreath”, but for some reason that makes me feel inexplicably prejudiced against it. So, Bird Wreath it is. Once again, no instructions included – love it. Organising all the pieces to resemble the artful creation in the display picture is much harder than you would expect, and it took quite a few tries, but I felt like it was forcing me to be creative. Impatient this time, I couldn’t be bothered painting all the pieces, and I actually liked the natural look of the MDF for this project. I did paint the birds and the base circle though, and looking back, I really should have taken the time to paint all the pieces. As I’ve hung the wreath outside, paint would have protected the MDF from moisture.

A good re-use for some old copies of Lawyers Weekly
I used one of the packs of paper from Kaisercraft to decorate this project, and the paper was of wonderful quality. I glued it on using PVA again, and then cut around the shapes with an xacto knife.

 I arranged the pieces in a nice configuration (after about 10 attempts), and photographed it as a guide. I used PVA to stick all the pieces together, although I would perhaps suggest superglue instead, as it dries much quicker. I started from the top layer of pieces, gluing them to the next pieces down, and so on, until I glued the whole structure to the base circle.

I needed to use some type of finisher to protect the MDF and paper from moisture and I wasn’t keen to use PVA again, after my unhappy results on the last project. Instead, I used a good quality varnish that I happened to have in my craft cupboard, and it worked perfectly. Fin!

This project only took a couple of hours, which I love – I always feel so good when I get things done!


Cost:
- $15 (or so) for the Bird Wreath
- $10 for the pad of assorted 6.5 in scrapbook papers
- I already had the glue and varnish
Now that I’ve shared my new favourite crafty store with you, I’d love to hear your favourites – which stores inspire you?


I love looking through Spotlight or Lincraft cause they have an extensive range in there bigger stores of crafty things. I have to know what project i’ll need items for before ill use them though otherwise I would buy too many craft products :)
I know what you mean, sometimes I just want to buy things on the off chance that I will need them one day! In fact, I do that more than I should :P
I LOVE the bird wreath, it looks great on your front door :)
Thanks :) It fell off about 5 seconds after I took the photos, I’ll have to put it back up more securely when I get home this evening.
Both of your projects are lovely!! You are such a creative lady!!!!
Thanks Miss Bridget :) It’s so exciting that we’re finally starting to get a few good craft stores here in Australia! I’ll always miss Hobby Lobby and Michael’s though!